Assembling Holman Adjustable Shelving – 4832L
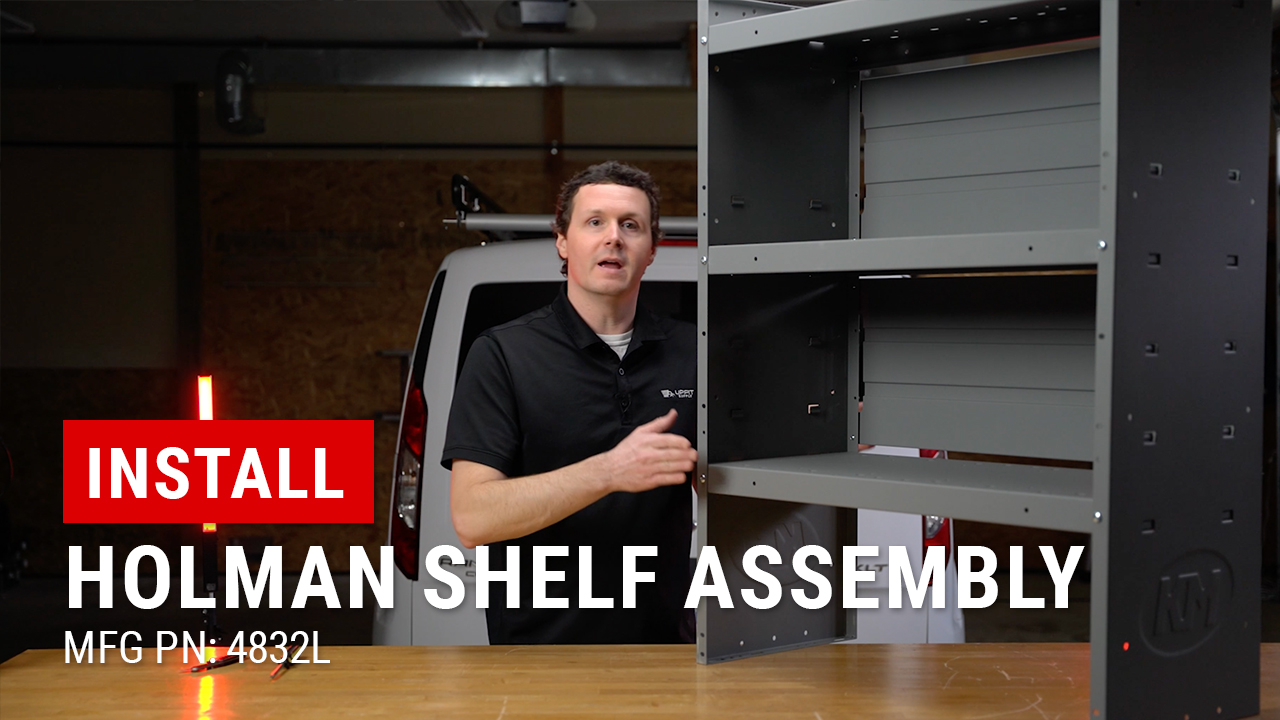
An organized van isn’t just easier to work in—it helps you get more done. That’s why the assembling Holman Adjustable Shelving (4832L) is a favorite upgrade for tradespeople and fleet operators alike. In this guide, we’ll walk you through every step—from unboxing to load testing—so you can set up your shelving unit in under an hour. Along the way, we’ll highlight key features like heavy-gauge steel construction and tool-free shelf adjustment that make this system as durable as it is flexible.
Why Assembling Holman Adjustable Shelving – 4832L Matters
First, cluttered cargo slows you down. Moreover, unsecured tools can shift and damage your load. Therefore, Holman 4832L shelving delivers:
- Customizable Shelf Heights: Adjust shelves in minutes without tools.
- Durable Powder-Coat Finish: Resists scratches and corrosion.
- Modular Design: Stack units or integrate drawers as needed.
- Heavy-Duty Weight Capacity: Holds up to 200 lb per shelf.
Consequently, your Transit Connect or ProMaster stays tidy, safe, and professional.
Tools for Assembling Holman Adjustable Shelving – 4832L
Before you begin Assembling Holman Adjustable Shelving – 4832L, gather:
- Rubber-mallet: Seat shelves without marring surfaces.
- Socket wrench (½″): Tighten any frame bolts.
- Tape measure: Verify spacing and alignment.
- Work gloves: Protect hands from sharp edges.
Meanwhile, clear the cargo area and park on level ground. This prep ensures smooth workflow.
Unboxing and Inventory Check
Next, confirm you have all parts before Assembling Holman Adjustable Shelving:
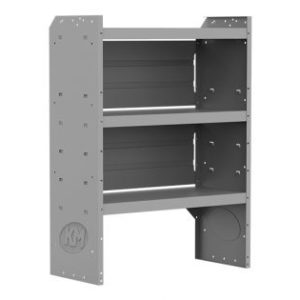
- (4) Upright posts
- (4) Shelf panels (32″ W × 43″ H × 14″ D)
- (16) Shelf clips (tool-free locking pins)
- (4) Base mounting brackets
- Instruction sheet with QR code for video tutorial
Furthermore, inspect each component for damage. Consequently, you avoid surprises mid-build.
Step-by-Step: Assembling Holman Adjustable Shelving – 4832L
Now let’s dive into the core process. Follow these clear steps to complete Assembling Holman Adjustable Shelving – 4832L:
1. Install Base Mounting Brackets
First, position the four lower brackets on the van floor’s existing anchor points. Then, secure with the supplied hardware. Meanwhile, leave bolts slightly loose to fine-tune alignment later.
2. Erect Upright Posts
Next, stand each upright post on its bracket. Make sure each post faces inward (with Holman logo visible). Afterwards, hand-tighten the bracket bolts to hold posts upright.
3. Snap in First Shelf Level
Now, choose the lowest shelf height. Consequently, insert four tool-free shelf clips into matching holes on each post. Then, slide the shelf panel onto the clips and tap with a rubber-mallet for a snug fit.
4. Adjust Additional Shelves
Repeat for any additional shelves. Meanwhile, stagger shelf depths if you’ll store tall items below. Moreover, the adjustable shelf heights feature empowers you to reconfigure van layout on the fly.
5. Tighten All Brackets
After confirming shelf levels are even, fully tighten all mounting and post-to-bracket bolts. Furthermore, inspect each clip to ensure it locks firmly under the shelf.
Final Checks After Assembling Holman Adjustable Shelving – 4832L
Once hardware is secured, complete these final checks:
- Level Shelves: Use a small level to confirm no tilt.
- Bolt Torque: Re-verify all bolts are snug per spec.
- Load Test: Place 50 lb of weight on each shelf to test stability.
- Access Door Clearance: Ensure rear door closes without interference.
Consequently, you confirm a safe, rattle-free setup.
Integrations and Accessories
After Assembling Holman Adjustable Shelving – 4832L, consider these add-ons:
- Drawer Units: Slide-out drawers for small tools and parts.
- Plastic Bins: Snap-in totes for loose hardware.
- Partition Clamp: Mount shelving directly to Holman partitions.
- Label Holders: Identify contents with quick-swap labels.
Moreover, these extras help maintain an ultra-organized workspace.
Maintenance Tips for Long-Term Use
To keep your Holman shelving in top shape:
- Clean Monthly: Wipe metal surfaces with mild detergent.
- Inspect Clips: Replace any bent shelf clips immediately.
- Re-torque Bolts: Check tightness every three months.
- Avoid Overloading: Respect 200 lb per shelf rating.
Furthermore, simple maintenance extends unit lifespan and safety.
Fast, Professional Van Upfit
At Upfit Supply, we know that Assembling Holman Adjustable Shelving – 4832L transforms your van into a mobile workshop. With rapid tool-free setup, heavy-duty support, and endless versatility, this shelving unit is a must-have.
Ready to elevate your cargo space? Shop now:
Holman 32″ × 43″ Adjustable Shelf Unit (4832L)
Watch our full assembly tutorial: Assembling Holman Adjustable Shelving – 4832L
With Upfit Supply, your van works as hard as you do—no exceptions.