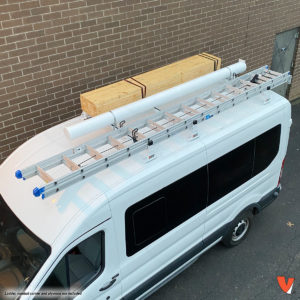
How To Install Vantech H1 Ladder Rack on a Ford Transit

If you’re looking to install a ladder rack on your Ford Transit, you’re in the right place. Whether you’re a contractor, tradesperson, or simply need a secure way to transport ladders, this guide will walk you through the step-by-step process of installing a Vantech H1 ladder rack. We’ll also include expert tips to ensure a smooth installation process.
Watch the Full Installation Video Here
Tools and Materials Needed for Installing a Vantech H1 Ladder Rack
- Vantech H1 Ladder Rack (Steel or Aluminum, 2-bar or 3-bar kit)
- Installation guide (included in the kit)
- Ratchet with a half-inch socket
- Plastic pry tool (to avoid scratches)
- Measuring tape
- Ladder (for roof access)
- Clean cloth (for surface preparation)
Step 1: Prepare for Installing a Vantech H1 Ladder Rack
Before climbing onto the van, prepare the ladder rack components on a workbench.
Pro-Tip: Make sure you have a clean surface before applying the rubber bar guard strips. This ensures they adhere properly and last longer.
- Unbox all components and verify the parts list.
- Identify whether you have a steel or aluminum system:
- Steel: Comes with adhesive rubber bar guards that stick onto the crossbars.
- Aluminum: Features a clip-in rubber bar guard that slides into the built-in channel.
- Apply the rubber bar guards to the crossbars, ensuring they are centered.
This preparation step ensures a smooth installation process when installing a Vantech H1 ladder rack.
Step 2: Locate the Mounting Points on Your Ford Transit
Ford Transit vans come with four pre-threaded mounting locations on the roof, making it easy to install a Vantech H1 ladder rack without additional drilling.
- Identify which locations you’ll use based on whether you have a two-bar or three-bar system.
- If using a three-bar setup, maximize spacing to accommodate long ladders.
Pro-Tip: A 6-foot step ladder fits best when mounted between points 4 and 2.
- Use a plastic pry tool to remove the rubber caps from the mounting points.
Step 3: Install the Uprights
- Position the uprights over the mounting holes on the roof.
- Insert the mounting bolt through the upright and foam gasket, ensuring the gasket fully covers the hole to prevent leaks.
- Loosely thread the bolt into the pre-threaded hole, keeping everything aligned.
Pro-Tip: Rear mounting bolts may seem short—apply gentle pressure to compress the gasket and foam washer for a secure fit.
By following these steps, you’ll ensure a proper fit when installing a Vantech H1 ladder rack.
Step 4: Attach the Crossbars
- Attach the first set of uprights on one side of the van.
- On the opposite side, position the crossbar along with the second upright before securing it.
- Loosely thread all bolts before tightening.
- Use a ratchet to fully secure the bolts once all uprights are aligned at a 90-degree angle.
Pro-Tip: Ensure the foam gasket completely covers the opening to prevent water leaks.
After this step, the main structure is set, making it easy to finish installing a Vantech H1 ladder rack.
Step 5: Secure the Crossbars to the Uprights
- Use two self-threading screws per upright to secure the crossbars.
- Position screws towards the back of the uprights for a clean look and easy access.
Securing the crossbars properly is essential when installing a Vantech H1 ladder rack to ensure stability and safety.
Step 6: Install Ladder Mounting Accessories
Your Vantech H1 ladder rack may come with additional mounting accessories like ladder stoppers and guides.
- Decide where to place the guides and stoppers based on your ladder size and frequency of use:
- Extension ladders: Guide on the middle bar, stopper on the front bar.
- Step ladders: Stopper on the second bar, guide on the rear bar.
- Attach these accessories using carriage bolts and hand-tighten them.
- Test with a ladder before fully securing the accessories.
These accessories help maximize ladder security and ease of use after installing a Vantech H1 ladder rack.
Final Checks Before Using Your Ladder Rack
- Double-check that all bolts and screws are tightened securely.
- Ensure the uprights are perfectly vertical.
- Test the stability of the rack by lightly shaking it.
- Verify that ladder accessories are properly positioned and secure.
Pro-Tip: A properly installed ladder rack will be rock solid. If there’s any movement, revisit the mounting points and tighten as needed.
After completing these final checks, you can be confident that your installation is secure and your Ford Transit is ready for work.
Easy DIY Ladder Rack Installation
Installing a Vantech H1 ladder rack is a straightforward process when you follow the right steps. By preparing your parts, aligning the uprights correctly, and securing everything tightly, you’ll have a professional-grade setup ready to transport your ladders safely.
Need a high-quality ladder rack for your van? Check out our full selection at UpfitSupply.com for top-rated van upfitting solutions!