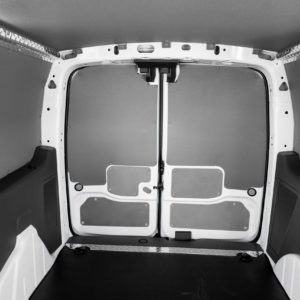
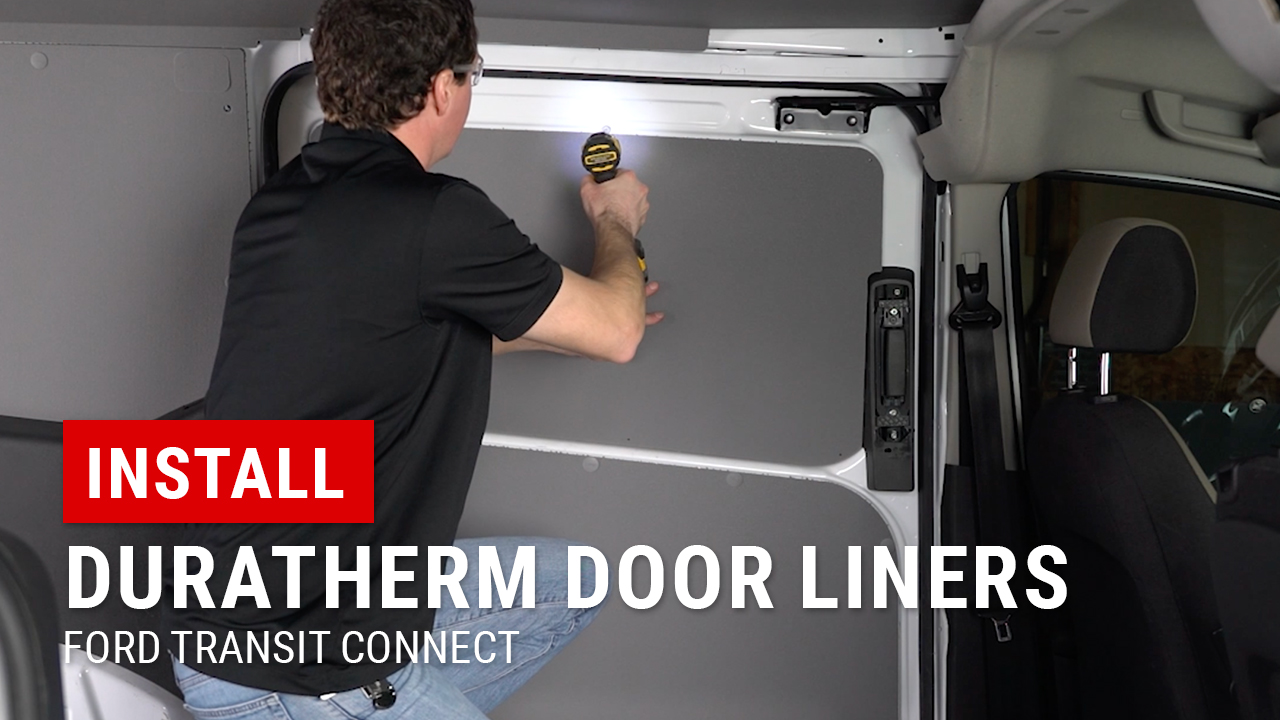
Installing DuraTherm Door Liners in Ford Transit Connect LWB
Protecting your van’s doors might seem like a small detail—but it makes a big difference over time. That’s why installing DuraTherm Door Liners for the Ford Transit Connect LWB is a must-have upgrade. In this guide, we’ll walk you through each step—from removing the factory trim to snapping in the edge caps—so you can outfit your side doors in under an hour. Along the way, we’ll highlight standout features like lightweight composite panels, sound-dampening backing, and an easy-to-clean textured finish that stands up to daily use.
Why Installing DuraTherm Door Liners in Ford Transit Connect LWB Matters
First, factory door panels tear and trap dirt. Moreover, bare metal dents easily under cargo impact. Therefore, Installing DuraTherm Door Liners offers:
- Custom Molded Fit: Precision contours for 2014–2021 LWB Dual Sliding Doors.
- Durable Composite: Resists scratches, dents, and stains.
- Noise Reduction: Sound-dampening backing cuts road noise.
- Low Maintenance: Hose off or wipe clean in seconds.
Consequently, your van’s interior stays pristine and professional.
Tools for Installing DuraTherm Door Liners in Ford Transit Connect LWB
Before beginning Installing DuraTherm Door Liners in Ford Transit Connect LWB, gather:
- Trim removal tools for factory clips
- Impact driver with Phillips bit for screws
- Rubber mallet to seat plastic push caps
- Protective gloves to handle liners safely
Meanwhile, park on level ground and clear the cargo area. This prep step saves time during installation.
Removing Factory Door Panels
First, prep your Transit Connect LWB’s doors:
- Remove Factory Trim:
Use your trim tools to pop out particle-board panels. - Clear Clips & Tabs:
Pry gently to avoid panel damage. - Store OEM Parts:
Keep trim pieces for future use or resale.
Next, vacuum behind panels to remove debris before liner installation.
Step-by-Step: Installing DuraTherm Door Liners in Ford Transit Connect LWB
1. Fit Lower Door Panel
- Align Clips: Position liner’s large push-pin holes over factory clips.
- Seat First Clips: Hand-press two at top for alignment.
- Tap Into Place: Use a rubber mallet to set all clips flush.
Consequently, your lower DuraTherm liner sits solidly against the door.
2. Secure Upper Door Panel
- Identify Left & Right: Note handle cut-out to select correct side.
- Position Screws: Insert provided self-tapping screws through liner holes.
- Cap & Cover: Slide decorative push caps onto screw heads.
- Torque Lightly: Use impact driver on low setting to avoid over-driving.
Meanwhile, check that no screw pinches liner material.
Final Checks After Installing DuraTherm Door Liners in Ford Transit Connect LWB
Once both side doors are complete:
- Inspect Fit: Confirm edges hug all contours without gaps.
- Test Operability: Open and close doors; ensure no binding.
- Verify Clips: Tug gently on liners to ensure all fasteners engaged.
- Snap Caps: Press each screw cap fully flush for a clean finish.
Finally, load cargo with confidence. The composite strength prevents metal dents under heavy loads.
Maintenance Tips for DuraTherm Door Liners
To keep liners looking new:
- Monthly Wipe-Down: Use mild soap and water.
- Inspect Clips: Check push caps; replace any warped caps.
- Avoid Harsh Chemicals: Stick to gentle cleaners on textured surfaces.
- Seasonal Care: Remove liners for deep clean if needed.
Moreover, these simple steps maintain both form and function.
Rapid Protection in Under an Hour
At Upfit Supply, we recognize that Installing DuraTherm Door Liners not only shields doors but boosts resale value. With durable composite panels, noise-reducing backing, and custom precision fit, this upgrade installs quickly and performs for years.
Ready for professional-grade door protection? Shop now:
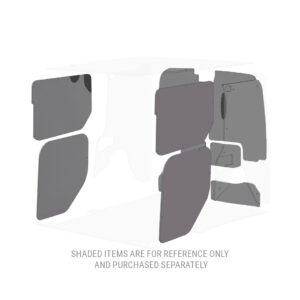
Legend DuraTherm Door Liner Package for Ford Transit Connect LWB
Watch the full tutorial: Installing DuraTherm Door Liners
With Upfit Supply, your van works as hard as you do—no exceptions.
-
 Legend Liner Package – Ford Transit Connect Cargo VanFrom: Original price was: $1,450.61.$1,182.35Current price is: $1,182.35.
 Select options
-
Sale!
DuraTherm Insulated Door Liner Kit for Ford Transit ConnectOriginal price was: $478.00.$454.10Current price is: $454.10.Made to order. Ships in 7-14 business days.Add to cart