Installing Holman Work Van Shelf in our RAM ProMaster

Van Storage Solutions: Organize Your Space with Ease
Keeping your van organized can make all the difference for work or travel. Van storage solutions, like adjustable shelving units, can transform your space, making it more efficient and accessible. In this article, we’ll walk you through how to install a Holman work van shelf in a RAM ProMaster.
The Importance of Van Shelves
Van shelves are essential for maximizing space and keeping your tools and equipment organized. Whether you’re a contractor, plumber, or an adventurer, having a well-organized van can save you time and stress. Here are some key benefits of van shelves:
- Enhanced Organization: Keep all your tools and supplies in designated places.
- Increased Space: Utilize vertical space to store more items.
- Easy Access: Find what you need quickly without rummaging through piles of stuff.
- Safety: Secure your items to prevent them from moving around while driving.
Types of Van Storage Solutions
Van storage solutions come in various forms, including shelves, drawers, and bins. Each type has its unique advantages:
- Adjustable Shelving Units: These are versatile and can be customized to fit different heights and types of items.
- Drawers: Ideal for small tools and parts, keeping them easily accessible.
- Bins: Perfect for storing loose items that need to be kept together.
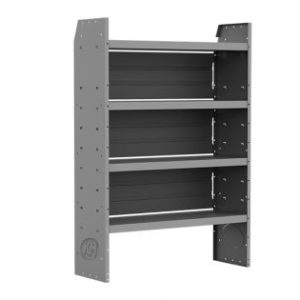
How to Install a Holman Van Shelf (48424)
Installing van shelves might seem daunting, but with a bit of preparation, it can be straightforward. Here’s a step-by-step guide based on our recent installation of a Holman adjustable shelving (part #: 48424) unit in a RAM ProMaster:
Step 1: Pre-Assembly
Assemble the shelving unit outside of the van where you have plenty of space to work. Start from the bottom and work your way up, ensuring each shelf is securely in place.
Step 2: Considerations
Before mounting the shelves inside the van, measure the space and account for any obstructions like wheel wells. Decide if you need to add accessories such as doors or drawers and ensure there’s enough clearance for them.
Step 3: Mounting the Shelves
Move the fully assembled shelving unit into the van with assistance, as it can be heavy. Align the shelves where you want them, ensuring they are level and centered. Mark the locations for your mounting brackets.
Step 4: Drilling and Securing
Drill holes for the plus nuts, avoiding critical components like electrical harnesses. Install the plus nuts and secure the shelving unit using the provided brackets and hardware.
Step 5: Final Adjustments
Tighten all screws and bolts, ensuring the shelves are secure and stable. Double-check that everything is level and make any necessary adjustments.
Tips for Maintaining Your Van Storage
- Regularly Inspect: Check the shelves and brackets for any signs of wear or loosening.
- Clean and Organize: Periodically clean your van and reorganize the shelves to maintain efficiency.
- Label Items: Use labels to identify where each item belongs, making it easier to find and return tools.
Find the Best Van Shelves
Van shelves and storage solutions are invaluable for anyone who relies on their van for work or travel. By following these steps, you can create a well-organized, efficient, and safe environment inside your van. For high-quality van shelving units and other storage solutions, check out our products at Upfit Supply.