Installing Luverne Grip Step XL on RAM ProMaster

Getting in and out of your van shouldn’t slow you down—or put you at risk. That’s why installing Luverne Grip Step XL for the RAM ProMaster is a must-have upgrade for safer, more efficient access. In this post, we’ll walk you through the installation, break down the key benefits, and share pro tips so you can count on secure, slip-resistant footing every time you step in.
Why Installing Luverne Grip Step XL on RAM ProMaster Matters
First, repeated entry and exit can be tough on knees and ankles. Therefore, adding a robust running board makes sense. Additionally, the Luverne Grip Step XL offers a large, non-slip surface. As a result, you reduce fall risk and speed up loading. Finally, the step enhances your van’s professional look and resale value.
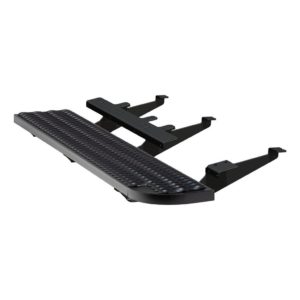
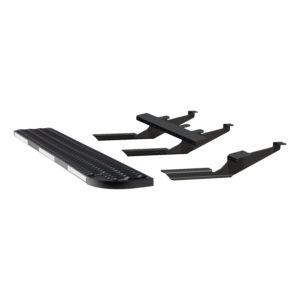
Overview of Luverne Grip Step XL Passenger Running Board
The Grip Step XL measures 9½″ × 54″, fitting long-wheelbase RAM ProMaster models. Furthermore, it uses heavy-gauge steel brackets for extra strength. Although we don’t manufacture it, we only sell top-quality products like this one. Consequently, you get a reliable step that stands up to harsh jobsite conditions.
Key attributes include:
- Powder-Coated Black Finish for corrosion resistance
- Welded Steel Construction rated for up to 500 lbs
- Treaded Surface for maximum traction in all weather
- Custom Fit Kit (495154-401802) designed for ProMaster
Key Features of the Grip Step XL
When you choose the Luverne Grip Step XL, you benefit from:
- Wide Platform: Offers stable footing even with bulky boots.
- All-Weather Grip: Raised studs prevent slips in rain or snow.
- Vehicle-Specific Brackets: No drilling is required on most models.
- High Load Capacity: Supports heavy equipment and repeated use.
Additionally, the step’s profile aligns seamlessly with the van’s rocker panel.
Step-by-Step: Installing Luverne Grip Step XL on RAM ProMaster
- Gather Tools and Parts
First, confirm you have the Grip Step XL kit, including mounting brackets, hardware, and instructions. Then, grab a Torx T55 bit, 13 mm socket, and 10 mm wrench. - Prep the Van Underside
Next, remove eight frame and rocker plugs using the Torx bit. Meanwhile, store them safely for re-use if needed. - Install Frame Studs
Then, insert slide-in studs into the frame holes. Flip their wings open to lock them in place. - Mount Front Bracket
Position the forward bracket up against the weld seam. Meanwhile, loosely secure it with the supplied bolts and lock washers. - Mount Rocker Support Bracket
Next, align the mid-body bracket on the rocker panel. Then, mark and drill four pinch-weld pilot holes. Finally, attach with carriage bolts and nuts, leaving hardware loose. - Install Rear Mounting Brackets
After that, bolt two rear support brackets to the frame studs. Meanwhile, slide them behind the side bracket for added strength. - Attach the Grip Step XL
Now, lift the step onto the brackets. Align its carriage-bolt holes with bracket slots. Then, insert bolts and lock nuts. Also, center the step under the door opening. - Final Alignment and Torque
Finally, adjust step position so it sits flush. Meanwhile, torque step-to-bracket bolts to 10 ft-lbs. Then, return under the van and tighten frame and rocker hardware to 20 ft-lbs.
By installing in this sequence, you ensure perfect bracket alignment and secure mounting.
Pro Tips for a Smooth Installation
- Reference Instructions First: Always follow Luverne’s manual.
- Use Thread Locker: A drop of blue Loctite prevents vibration loosening.
- Work Safely: Support the van on jack stands for clear access.
- Check Clearance: Verify step doesn’t interfere with sliding door operation.
- Retain Loose Hardware: Spare bolts and nuts come in handy for adjustments.
Moreover, performing a shake test confirms a rattle-free installation.
Maintenance and Care for Your Grip Step XL
After installing, keep the step in top condition:
- Wash Regularly: Use mild soap and water to remove grime.
- Inspect for Rust: Touch up any chipped areas with black spray paint.
- Tighten Fasteners: Check hardware every six months under heavy use.
- Lubricate Brackets: Apply corrosion-resistant spray to mounting points.
These simple practices extend the step’s lifespan and performance.
Elevate Your ProMaster with Luverne Grip Step XL
At Upfit Supply, we know that installing Luverne Grip Step XL on RAM ProMaster delivers unmatched durability and safety. With vehicle-specific brackets, steel-reinforced step, and all-weather grip, this running board transforms your workflow. Ready for effortless entry? Explore the product and tutorial below:
- 🔗 Grip Step XL Running Board for RAM ProMaster
- Luverne Grip Step XL Kit Details
- Watch the Tutorial: Installing Luverne Grip Step XL on RAM ProMaster
With Upfit Supply, you get solutions that work as hard as you do—no exceptions.
-
Sale!
 Grip Step XL 9-1/2″ X 54″ Steel Passenger Running Board for RAM ProMasterOriginal price was: $343.37.$310.95Current price is: $310.95.500+ in stock. Ships within 1-3 business days.
 Add to cart
-
Sale!
Luverne Grip Step XL 9-1/2″ x 54″ Steel Passenger Board Fleet Kit, Select Ram ProMasterOriginal price was: $353.22.$319.95Current price is: $319.95.500+ in stock. Ships within 1-3 business days.Add to cart